
Building an adaptive bitrate video streaming service

A while back, I got the opportunity to work on a medium-scale video streaming project, and I wanted to share my experience and how I built it. I built a video streaming platform designed for remote training centers and mobile users dealing with really bad, unstable internet. The goal was simple but tough: take high-quality classroom lectures or onsite training videos, process them fast, and make sure they streamed smoothly on any device or operating system.
To make it work across different platforms back then, I used a solid open-source stack: FFmpeg to isolate tracks and handle encoding, MPEG-DASH to deliver the streams, and Google Shaka Player on the front end to manage adaptive bitrate streaming. While that setup did the trick and kept remote classrooms running, video streaming technology has come a long way since then.
In this post, I want to walk through how I built that system, covering the basic architecture, the tools I used, and the key decisions I made. Whether you're preparing for the basics of video streaming, system design interviews, or planning your own streaming service, I hope this will be helpful.
How Adaptive Bitrate Streaming Works (5-Step Overview)
To make adaptive bitrate streaming simple to understand, let's trace a video from raw input all the way to a user's screen.
Imagine we have a high-quality lecture or training video provided as an MP4 file (input.mp4). To make it accessible to a wider audience, we also have audio voiceover tracks in three different languages like: English, Kannada, and Hindi.
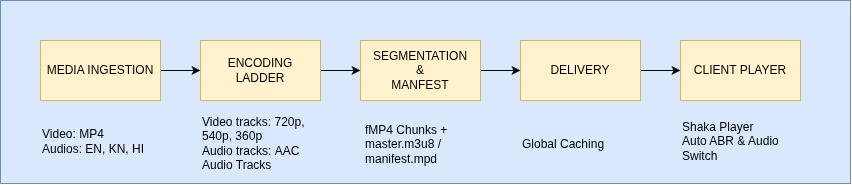
Here are the 5 core steps required to turn these raw files into a smooth streaming experience:
- MEDIA INGESTION: Receiving and preparing source files.
- ENCODING LADDER: Creating multiple video resolutions and bitrates.
- SEGMENTATION & MANIFEST: Slicing video into small chunks and creating index files.
- DELIVERY: Caching and serving content via Cloud Storage & CDN.
- CLIENT PLAYER: Playing the stream dynamically using Google Shaka Player.
Step 1: Media Ingestion
Media Ingestion is the starting point of the pipeline. This is where source media files are uploaded, validated, and stored ready for processing.
The Input Files
In our project example, we ingest:
input.mp4: The primary video track (high-definition video).audio_en.wav: Audio track in English.audio_kn.wav: Audio track in Kannada.audio_hi.wav: Audio track in Hindi.
Key Concept: Track Isolation
Instead of rendering three separate full video files for each language (which would triple our storage costs and processing time), we keep the video track separate from the audio tracks.
We decode the main video once and process each audio language as an independent standalone audio stream. This allows the end viewer to switch audio tracks on the fly without having to re-download the entire video stream.
Step 2: Encoding Ladder
Once the files are ingested, they move into the Encoding Ladder stage.
If a viewer has a slow 3G connection or unstable Wi-Fi, sending a massive 1080p high-bitrate video will cause continuous buffering and freezing. To fix this, we convert the single source video into multiple representations—varying in resolution and bitrate.
                ┌─► 1080p (Full HD Quality) ─►  1800 kbps (For stable Wi-Fi / Broadband)
                │
                ├─► 720p (HD Quality)       ─►  800 kbps (For stable Wi-Fi / Broadband)
[Original MP4]  │
                ├─► 540p (Medium Quality)   ─►  400 kbps (For 3G / average cellular)
                │
                └─► 360p (Low Quality)      ─►  150 kbps (For slow 2G / weak networks)
Audio Track Encoding
At the same time, we compress each audio file (English, Kannada, Hindi) into lightweight AAC audio streams running at 96 kbps.
Single-Pass FFmpeg Encoding
Instead of processing each resolution or audio file in separate commands (which wastes CPU and disk I/O), we use FFmpeg to encode all video qualities and audio languages concurrently in a single pass:
# Single-Pass FFmpeg command to encode 4 video resolutions & 3 audio languages
ffmpeg -i input.mp4 \
  -i audio_en.wav \
  -i audio_kn.wav \
  -i audio_hi.wav -y \
  -filter_complex "[0:v:0]split=4[v1,v2,v3,v4]; [v1]scale=1920:1080[v1080]; [v2]scale=1280:720[v720]; [v3]scale=960:540[v540]; [v4]scale=640:360[v360]" \
  -map "[v1080]" -c:v:0 libx264 -b:v:0 1800k -maxrate:v:0 1900k -bufsize:v:0 2700k -g:v:0 120 -keyint_min:v:0 120 -sc_threshold 0 \
  -map "[v720]" -c:v:1 libx264 -b:v:1 800k -maxrate:v:1 850k -bufsize:v:1 1200k -g:v:1 120 -keyint_min:v:1 120 -sc_threshold 0 \
  -map "[v540]" -c:v:2 libx264 -b:v:2 400k -maxrate:v:2 450k -bufsize:v:2 600k -g:v:2 120 -keyint_min:v:2 120 -sc_threshold 0 \
  -map "[v360]" -c:v:3 libx264 -b:v:3 150k -maxrate:v:3 250k -bufsize:v:3 300k -g:v:3 120 -keyint_min:v:3 120 -sc_threshold 0 \
  -map 1:a -c:a:0 aac -b:a:0 96k -metadata:s:a:0 language=eng \
  -map 2:a -c:a:1 aac -b:a:1 96k -metadata:s:a:1 language=kan \
  -map 3:a -c:a:2 aac -b:a:2 96k -metadata:s:a:2 language=hin \
  -f dash \
  -adaptation_sets "id=0,streams=v id=1,streams=a" \
  -seg_duration 4 -use_template 1 -use_timeline 1 \
  -hls_playlist 1 -hls_master_name master.m3u8 \
  manifest.mpd
Step 3: Segmentation & Manifest Creation
Web browsers cannot efficiently stream giant monolithic files. Instead, streaming relies on Segmentation and Manifest files.
1. Segmentation (CMAF / fMP4)
During encoding, FFmpeg cuts the video and audio streams into tiny 4-second fragments called segmented MP4s (fMP4).
- Video chunks are created for each quality level (360p, 540p, 720p).
- Separate audio chunks are created for English, Kannada, and Hindi.
Using the CMAF (Common Media Application Format) standard allows the exact same physical fragments to work across both Apple and Android ecosystems.
2. Manifest Creation (HLS & MPEG-DASH)
Along with media segments, FFmpeg generates playlist files called Manifests. A manifest acts like a table of contents or map for the video player.
File Types Generated for DASH vs HLS
MPEG-DASH Files
- Manifest File (
manifest.mpd): An XML file containing metadata for all video representations (1080p, 720p, 540p, 360p) and audio tracks (English, Kannada, Hindi). - Media Segments (
chunk-stream*.m4s): The actual 4-second video and audio fragments. - Initialization Files (
init-stream*.mp4): Header files containing codec info required by the browser to decode.m4schunks.
Apple HLS Files
- Master Playlist (
master.m3u8): UTF-8 text file listing all available video variants and audio playlists. - Media Playlists (
media_0.m3u8,media_1.m3u8, etc.): Individual sub-playlists indexing chunk URLs for specific resolutions or audio languages. - Shared Media Segments (
chunk-stream*.m4s): Thanks to CMAF, HLS reuses the exact same.m4schunk files created for DASH rather than creating redundant.tsfiles.
Summary Comparison Table
| Streaming Protocol | Main Index / Manifest | Sub-Playlists | Media Segments |
|---|---|---|---|
| MPEG-DASH | manifest.mpd (XML) |
None (Included inside .mpd) |
init-stream*.mp4 + chunk-stream*.m4s |
| Apple HLS | master.m3u8 (Text) |
media_0.m3u8, media_1.m3u8 (Text) |
Reuses the same chunk-stream*.m4s |
Step 4: Delivery (Cloud Storage & CDN)
Once segmentation and packaging are complete, the output media files (manifests and fMP4 segments) are moved to the distribution layer.
Cloud Storage
The files are stored in object storage like Amazon S3 or Google Cloud Storage.
Content Delivery Network (CDN)
Directly serving video segments from object storage can cause slow load times and high bandwidth costs. To optimize delivery:
- A global Content Delivery Network (CDN) (such as Cloudflare, AWS CloudFront, or Fastly) sits between the storage origin and the end users.
- The CDN caches media segments at edge servers located close to viewers worldwide.
- When a user requests segment #5 of a video, it is served instantly from the nearest local edge server, providing fast buffering times and reducing origin server load.
Step 5: Client Player (Google Shaka Player)
The final step happens inside the user's web browser or mobile app. The video player is responsible for continuously monitoring network conditions and delivering smooth playback.
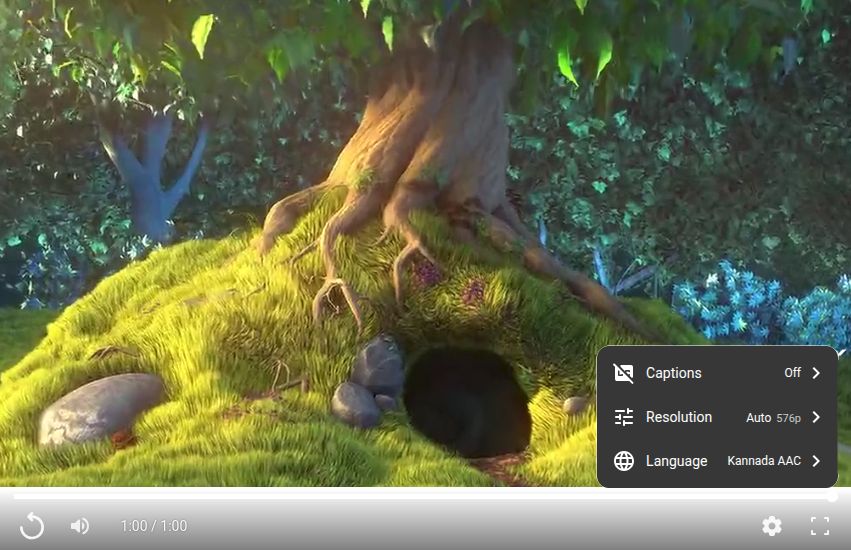
In our application, we use Google Shaka Player—an open-source JavaScript library that seamlessly supports Adaptive Bitrate (ABR) streaming and multi-language track switching.
How the Player Works:
- Fetches Manifest: Reads
manifest.mpdto discover all available video qualities (1080p, 720p, 540p, 360p) and audio languages (English, Kannada, Hindi). - Adaptive Bitrate Engine: Automatically measures network download speeds. If the viewer's connection drops, Shaka Player seamlessly switches down from 1080p to 360p without pausing playback. When the network recovers, it switches back up.
- Language Selection: Enables viewers to pick their preferred voiceover track (English, Kannada, or Hindi) from a UI menu at any time.